This article concerns general setup for online payments, which forms the basis for taking payments through Bookstore, recurring payments and donations, and items like application fees, etc.
- If you wish to activate Populi Bookstore, read this article.
- To set up recurring payments, follow the directions in this article.
- To set up recurring donations, have a look at this article.
You can use Populi to accept online payments for tuition, fees, bookstore purchases, applications, and donations. Online payment options include credit cards, debit cards, electronic checks (ACH), and external checkouts.
- If you use a payment processor—Stripe or Authorize.net—credit/debit and ACH payments are handled within Populi; the payer stays on the Populi payment page (while the transaction itself is handled ny the processor behind the scenes).
- An external checkout—Paypal, for example—takes the user to a third-party website where the payment is processed. The third-party site may accept any number of payment methods (cards, cryptocurrency, bank transfers, etc.). The payment information and processing occurs entirely on the third-party site; when it is complete, the user is returned to Populi.
Payment Processors
Populi's online payments work through integrations with a number of different payment gateways/processors and external checkouts...
- Stripe is a payment processor that lets your school accept online payments by card and (for qualifying schools) ACH. For further information, have a look at their pricing page and Privacy & Terms page. You can sign up for Stripe through Populi's Add Payment Gateway dialog or connect an existing account to start taking payments. Stripe is an excellent service with a simple fee structure and lots of reporting and reconciliation tools.
- Authorize.net lets your school accept online card payments; ACH payments are available through eCheck at a separate fee structure from card payments. Technically, Populi integrates with Authorize.net's Payment Gateway option; (they also offer a payment processing service); this means that if you are already working with another payment processor, you can continue to use them provided you use the Authorize.net gateway. You will need to fill out an application with Authorize.net outside of Populi, and then enter your account credentials in the Add Payment Gateway dialog. Authorize.net is a good service but charges a number of fees on top of individual transaction fees.
- Paypal is the ubiquitous payment checkout that works just about all over the Internet. Populi works with Paypal Business accounts (not individual accounts); you'll need to set up an account with them and then add those credentials to Populi. In contrast to a payment processor—which lets the payer stay in Populi when making a payment—Paypal is an external checkout, which means that the payer will be taken to their site to complete the transaction. Compared to the other payment options, Paypal is definitely the priciest option, but given its global reach and familiarity to people around the world, it can fill in gaps in your online payments setup—especially if you receive a lot of international payments. We recommend using Paypal as a supplement to your main payments setup.
The setup story
- If necessary, you set up accounts in your Chart of Accounts to which you direct funds received through online payments.
- You fill in the required settings in Financial > Settings > Online Payments.
- In Financial > Settings > Payment Gateways, you get set up with a payments processor. Your options:
- Fill in the Stripe account setup form accessed through Add a Payment Gateway > Stripe.
- Apply for an Authorize.net payment gateway account at their website. You may also need a credit card merchant account. If you wish to take ACH payments through their eCheck service, that will require a separate application; make sure you get set up for Internet-initiated Entry (a.k.a. WEB)—there are other options, and they don't work with Populi!
- Connect your school's Paypal Business account to Populi (we recommend this as a supplement to a Stripe or Authorize.net setup, rather than as a primary processor; that said, do as you wish).
- You run a test transaction. If everything checks out, you can now start accepting online payments!
Step one: Chart of accounts

Several settings in the online payments setup process require that you link an item to your Chart of Accounts.
- You'll need to select an asset account into which you'll deposit funds received through cash, check/echeck, and credit/debit card transactions.
- Likewise, you'll need to select asset accounts for your payment gateway accounts (if you have more than one).
- If you're charging a payment platform fee for credit/debit transactions, you'll need an income account for it.
Review your Chart of Accounts and make sure you have the accounts you'll require for the above settings. There's a chance you won't need to do anything, but it never hurts to be sure.
Step two: Financial > Settings > Online Payments

Go to Financial > Settings > Online Payments and fill in the following settings. When you're done, scroll back to the top of the screen so you can Save Settings.
Asset accounts
Select asset accounts from your Chart of Accounts into which payments from credit cards, checks (including electronic checks), and cash will be deposited.
Minimum credit card purchase
Enter the minimum amount for which a person may use a credit/debit card to pay an invoice. Each such transaction incurs a fee; imagine having to pay out 33 cents because someone paid a 10-cent library fine with their credit card!
Privacy Policy
A good Privacy Policy discloses, at minimum, the following items:
- What information you collect
- With whom you share it
- How it can be corrected
- How it is secured
- How you communicate changes to the policy
- How to address customer concerns over misuse of personal data
Receipt address and phone number
Enter the receipt and phone number you wish to print on receipts for online payments.
Refund Policy
Your Refund Policy must cover tuition, fees, and anything else for which you will accept credit cards and/or electronic checks as payment. Use clear, simple, direct language. Cross-reference what you enter here with the automated refund policies in Billing > Settings.
Recurring payments
Choose what kind of recurring online payments to permit using the drop-down. You can also enter optional text for an email to be sent to the payer every time you charge a recurring payment. Read more about recurring payments.
Recurring payments/donations work with Stripe and Authorize.net—they do not work with external checkouts!
- The week-based options will charge the donor on the same day of the week at the chosen interval.
- The second three options will charge the donor on the same calendar day at the chosen interval.
- Payment Plan Based lets payers set up automatic payments determined by their payment plan.
Email Online Payment Receipts to Students and Payers
When someone makes an online payment to a student's account, select whether to email an online payment receipt to the student and the payer.
Online payments may not exceed balance
Select Yes to prevent students and third-parties from paying more than the student's entire outstanding balance.
Include a comment text field on the online payments form
If you'd like to give online payers the option to leave a text comment on the payment, select Yes.
Step three: Financial > Settings > Payment Gateways

Go to Financial > Settings > Payment Gateways. The Add Payment Gateway dialog lets you set up a new account with a payment processor or enter credentials for an existing account.
- Click Add a payment gateway.
- Select a provider:
- If you select Stripe, click Connect to Stripe. Fill in the signup form (or log in with an existing Stripe account). Once you save, it will automatically connect to Populi.
- If you select Authorize.net, enter the Login and Transaction Key they sent you after your account was approved.
- If you select Paypal, you'll be taken to Paypal's login page, where you'll log in with your school's Paypal Business account credentials (a personal Paypal account will not work).
- Check the payment methods you wish to enable for this gateway.
- ACH (e-checks and the like) are only available to U.S.-based bank accounts. If your school is not in the U.S. (or doesn't have a U.S.-based bank account), then you cannot use ACH payments.
- If you'd like to accept e-checks and ACH payments through Stripe, please contact Populi Support.
- To accept e-checks and ACH through Authorize.net, you'll need to sign up for eCheck.net™.
- Paypal can only be set up as an "External Checkout".
- If funds received through this gateway should go to an asset account other than the one you selected for credit cards in the Online Payments settings view, choose an override account.
- To help with reconciliation, Stripe users can designate an expense account in which to record the processing fees charged by Stripe for transactions. See below for more details.
- Payment platform fees charged to payers can help you offset the processing fees levied by your payment provider for credit/debit card transactions. If you wish to charge one, enter the platform fee's percentage. This percentage will be added on top of the charges shown on the Pay Now page. Then, select an income account for the fee.
- Before adding a payment platform fee, please check with your payment processor and the applicable local laws to see what laws or regulations apply to such fees. There's actually a surprising variety of official guidance on these things, so take this seriously!
- Finally, click Save to add this payment gateway.
How platform fees and processing fees work
If you elect to add a platform fee and an expense account for processing fees for payments made through particular gateways, here's how they'll work. To make the math easier to follow, let's say someone makes a $1000 payment when your processor charges 2.9% + .30 and you have a platform fee of 2.9%:
- On the online payment page, a $29 platform fee is added to the payment for a total of $1029. In your GL, you'll then see two separate transctions...
- One with four entries:
- $1000 debit to your Stripe asset account
- $29 debit to your Stripe asset account
- $1000 credit to your accounts receivable
- $29 credit to your platform fee income account
- And a $30.14 [($1029 x 2.9%) + .30] transaction for the processing fee:
- $30.14 debit to the processing fee expense account
- $30.14 credit to your Stripe asset account
Uses for payment gateways
You can specify which payment gateway you wish to use for different kinds of online payments. For example, you may use Authorize.net for bookstore, but you want tuition, fees, and donations to go through your Stripe account. Or you may want to specify different gateways for different campuses.
eChecks are not available for use in Bookstore or to pay application fees. eChecks are best suited for larger transactions between trusted parties (for example, an enrolled student paying tuition) and Bookstore and application fee transactions can be A) quite small and B) involve payers with whom you have no relationship. Remember that recurring payments and donations only work with Stripe or Authorize.net—they do not work with external checkouts like PayPal!
The uses for your payment gateways are Tuition & Fees, Application Fees, Bookstore, Forms, Transcript Requests, and Donations. You should seldom have any need to change these uses. To change the uses:
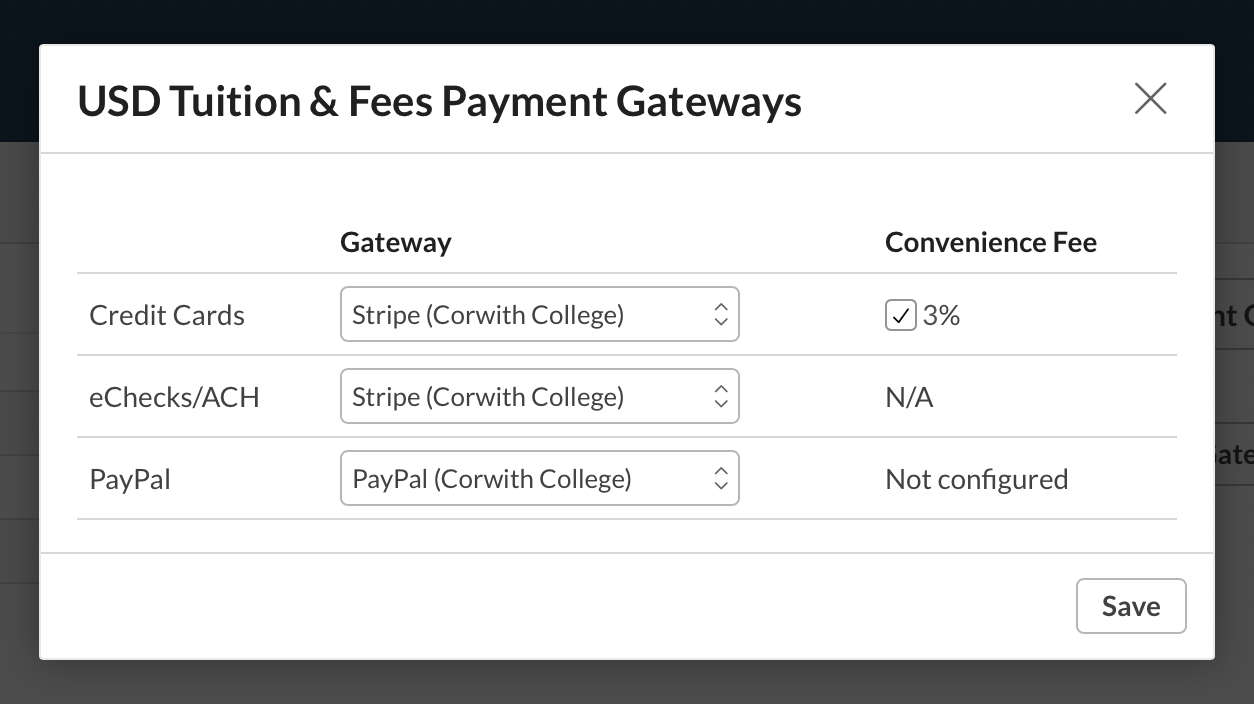
- Click the use name.
- Select the gateway you wish to use for the different payment types, or select None if you don't wish to use that payment type for that use.
- Check if you wish to require the payment platform fee for that gateway for transactions of this type.
- If you wish to allow an external checkout option for the use, check the box and select the checkouts you'd like to use.
Step four: Run a test transaction
Now that you've enabled online bill pay, you're ready to run a test transaction. This helps verify that everything's working as it ought to.
- If you're using Authorize.net, make sure that you've taken your account out of Test Mode. Consult Authorize.net's documentation for details. If you're using Stripe or an external checkout, you're ready to go the moment you complete the signup form.
- Invoice yourself for a small fee that's due today. For testing purposes, you might want to lower your minimum credit card purchase setting.
- On your Populi Home page, there will be an alert about the invoice. Click the alert to go to the payment page.
- Pay with a credit card and/or electronic check (if you've enabled both, you should repeat this testing process for both payment methods).
- After the transaction is completed in Populi, check your processor or external checkout's reporting (and your credit card account) to verify that it went through properly.
- Optional, but probably quite helpful in the long run: refund the transaction to familiarize yourself with that process.
0 Comments