
Pages let you collect online donations. You can send donors directly to a page's unique URL, or you can embed the page within another web property. Pages can be connected to individual campaigns and appeals, which helps you track which fundraising efforts get the best results.
- Once you enable online donations, Populi creates a Default donation page.
- When you create a page (see below), you establish how it will function—which funds, what amounts, etc. The basic page collects donation information, but you can further design it to collect information for your custom donations fields.
- Pages include a visual captcha panel that appears only when there is a suspicious level of traffic hitting your donation forms. In all likelihood, your donors will never see it.
- Click get embed code to generate an iframe code you can integrate into any of your other sites.
- Below the embed code you'll have an option to get a QR code for the donation page. People can use their smartphone's camera (or a QR scanner app) to scan the code and go directly to the donation page.
- Click Get QR Code.
- Modify the code's appearance as desired—you can change the color, add/remove the Populi logo, change the size, and change the module types.
- When you're ready, click Download.
- An
.SVGfile will download to your computer. You can then incorporate the QR code into any kind of printed matter.
Creating a new page

To create a new online donation page, start in either of these two spots:
- Go to Settings > Pages and click Add a page.
- Go to a campaign page and click add next to Online Donation Pages.
Then, fill in the settings:
Internal name
This lets you identify the page within Populi; donors will not see it. If you're creating multiple pages to match up with individual campaign appeals, the internal name is the best way to distinguish these pages at a glance. For example, if you have appeals called Donate Now Postcard and Donate Now Email, you might create two pages called DN Postcard and DN Email.
Page title & message
These optional items will be visible to donors visiting the page.
Campaign/Appeal
If you wish to connect this page with one of your campaigns, select it from the drop-down. You can then select from that campaign's appeals (if any) in another drop-down.
Fund
You can let your Donors choose from any of your funds, set a single fund to which they can donate, or allow them to choose multiple funds over which they can distribute portions of their donation.
Amount
Select the amount options available to your online donors. You have four options:
- Any amount over: Enter the minimum donation amount for this page. Keep in mind the Minimum online donation amount in Settings > General.
- Choose from preset amounts: Enter specific amounts for your donors to choose from. As you go, new fields will appear so you can add as many preset amounts as you need. When you’re done, just leave the last one blank.
- One preset amount: Enter one specific amount for donors visting that page to donate.
- Preset amounts OR any amount over: Lets you combine a number of preset amounts together with a minimum donation amount.
Thank you
Select a thank-you page option to show your donors after they submit a donation. You have three options:
- Default: This directs donors to the standard, built-in Populi Thank you page, which simply says, “Thank you for your donation to [School Name]” and links to a donation receipt.
- Message: Enter your own thank-you message; the donor will be directed to a page with this message and a link to a donation receipt.
- Redirect: Enter a URL to which to send your donors after they submit their donation.
Additionally, an email containing a brief Thank-you and a link to the donation receipt will be sent to the email address supplied by the donor.
Custom CSS
Copy-paste CSS in the text area to give the page a similar look and feel to the website in which you're embedding it.
Send email receipt
Check this to automatically email the donor an electronic receipt. You can always send a receipt later on; the default and message thank-you pages also contain links to the receipt.
Donor comment
Check to give donors a comment box on the donation page.
Allow recurring
Check to allow your donors to create recurring monthly donations based on the options they choose on this page.
Payment Gateway Override
If you have more than one payment gateway set up, you can specify a different gateway for this page besides the one designated for donations in your payment gateway uses.
Designing your donation page
The basic donation page consists solely of a fund selection and donation amount (the exact options depend on your settings). You can also add headings, text, and fields that link to your custom donations fields. When the donor fills out the fields and submits the donation payment, their entries will be imported to the donation page.
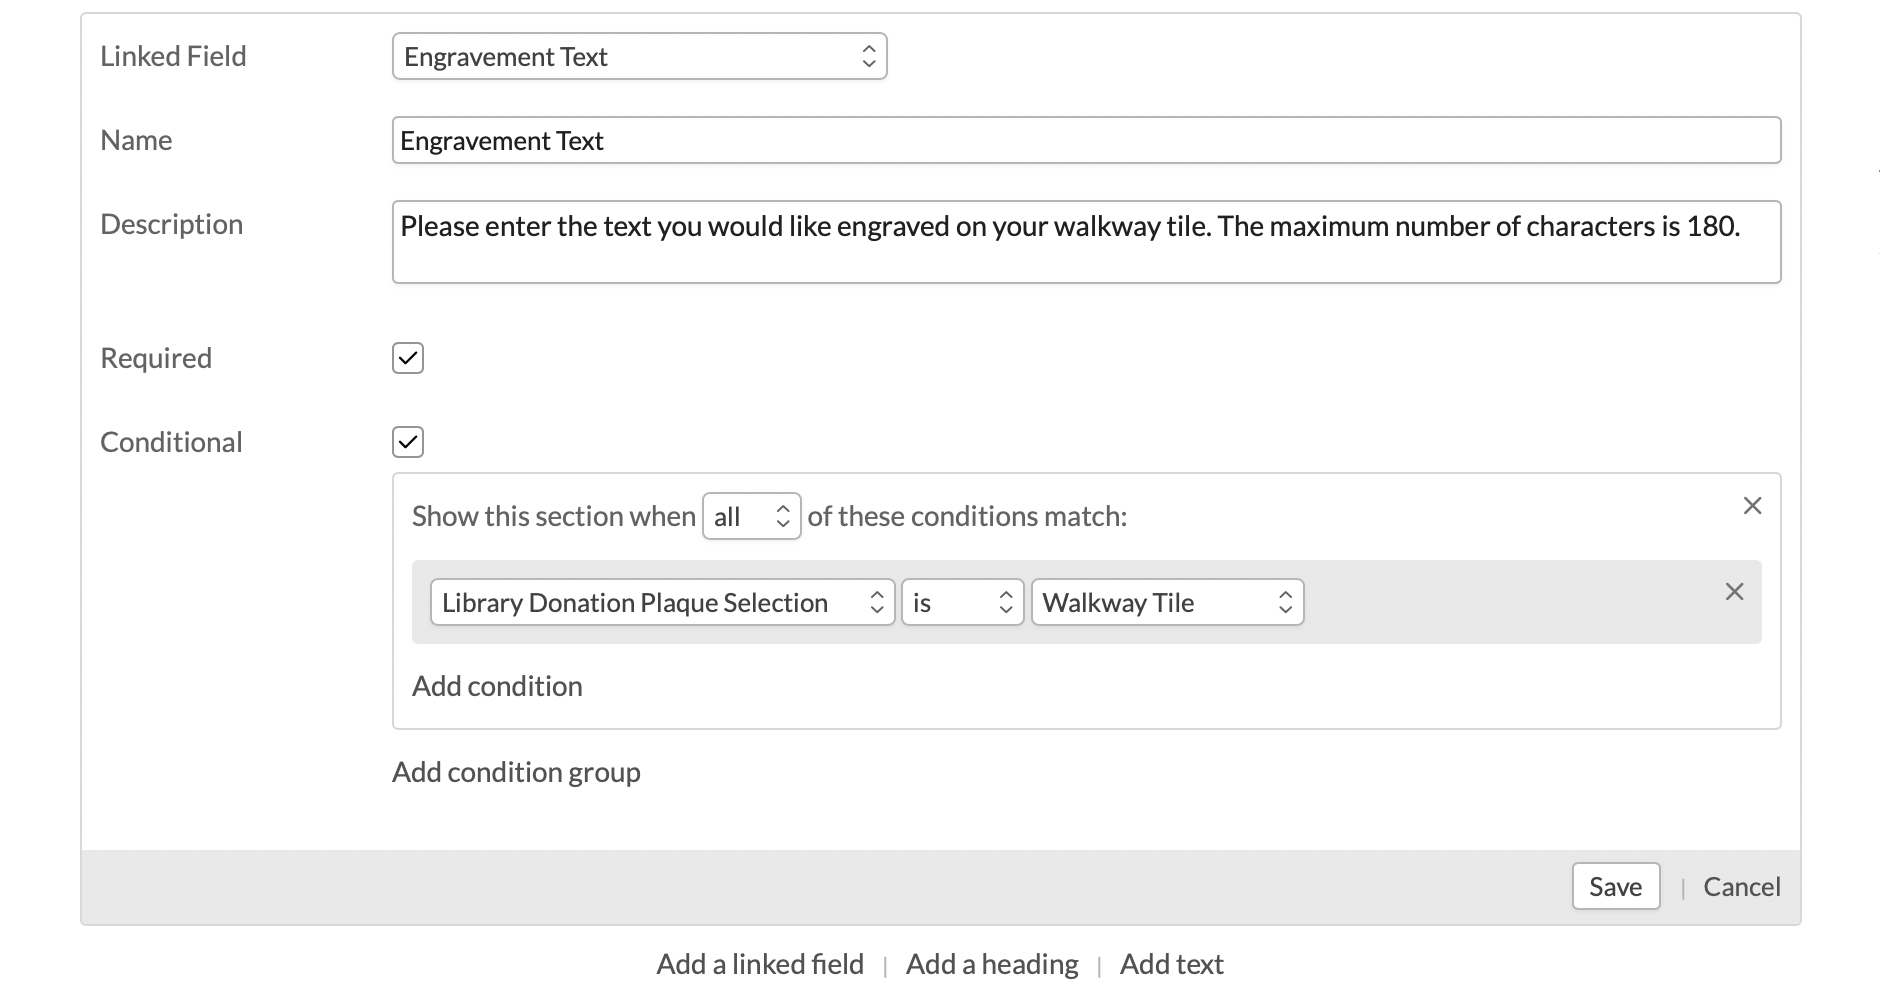
We trust that headings and text are self-explanatory. Here are your options for adding a linked field:
- Click Add a linked field.
- Select the field for which you'd like to collect information.
- Check if the field should be Required—without a complete response to all required fields, the form cannot be submitted.
- Check if the field is Conditional. (You'll only have this option if a previous linked field has preset options—Radio, Checkbox, etc.) A new part of the dialog will appear: this lets you define the conditions under which this field will appear to the donor.
- Choose whether to show this section when any or all of the conditions match.
- In the dropdowns, pick from the previous fields and their answer options.
- You can add multiple conditions and additional condition groups. If you have multiple condition groups, the field will appear when each of the condition groups has been checked.
- When you're done, click Save.
0 Comments