In this article, you'll learn how to create a new test question. Questions are a combination of the question and its answers/options. When you create a question, it is added to the test Questions view. This lets you use the question...
- When adding existing questions to another test in your course.
- In other sections or future instances of that same course.
- If enabled (by an Academic Admin), to be shared with other courses.
Here's how to add a new question:
- In the Design view of the test, click Add question.
- Fill in the question details and settings (described below).
- Click Save.

1. Select the question type
You have nine question types to choose from:
- Multiple Choice: Your students choose one answer from several. Simply type the answers in the fields. Use the radio button to designate the correct (100%) answer, and use the drop-downs to mark partial credit (e.g. 50%) for incorrect answers.
-
Short Answer: Your students enter free-form text answers. Leave the answer field blank if you wish to manually grade all answers to this question. You may also type certain common answers (correct or incorrect) and assign full, partial, or no credit so Populi can automatically grade them for you.
- Check Use case-sensitive grading to require students to correctly capitalize (or not) their answers.
- Automatic grading on short answers only works with exact matches. You'll have to manually grade non-matching answers in To Be Graded.
- Put in Order: Your students put a jumbled list in the correct order; full and partial credit are both automatically graded. Type the options in the correct order; Populi automatically jumbles the options.
- Multiple Answer: Your students check off all correct answers; these are automatically graded. Type the options and then check all that are correct.
- Essay: Your students submit essay-length answers in a large text area. Learn about options for essay questions below.
- True/False: Your students check whether a statement is true or false. These are automatically-graded.
- Matching: Your students match terms to one another. Simply enter matching terms next to each other in their respective columns. You can also enter additional "dummy" terms in the right column. Both columns will be randomized.
- Fill-in-the-blank: Your students enter the missing term(s) in a statement. Learn more below.
- File Upload: The student submits a file. Depending on the options you enable, they can upload a file or use Populi to record an image, audio clip, or video.
2. Type your question
Use the WYSIWYG editor to compose your question. You can also include a media file in the question:
- Copy the EMBED code from any media file.
- Paste it into the text of the question or text block.
- In Design mode, the file may appear improperly sized; for an accurate view of what your students will see, check the Preview tab.
3. Add a file (optional)
Click to choose a file or drag and drop one onto the file upload area.
4. Enter answers
See above for details about what options you'll have for each question type. For automatically-graded questions, make sure you designate which options get full credit and which get partial credit (75%, 50%, 25%...). You can also leave feedback comments for each answer.
5. Choose whether to randomize
Check to randomize the answer display for multiple choice and multiple answer questions. This presents the answer options in a different order to each student.
6. Enable partial credit scoring (optional)
Check to enable partial credit scoring for multiple answer, put in order, and matching questions (partial credit is particularly useful for matching questions with a lot of terms).
7. Categories (optional but highly recommended)
Categories are like tags for questions. Use them to distinguish questions from one another (i.e. "Easy" vs. "Hard"; "Iliad" vs. "Odyssey"; "Algebraic Geometry" vs. "Algebraic Combinatorics"; and so on). Among other things, categorizing question gives you the option to later include a group of questions from a category on another test.
- Type a new category name and press Enter/Return on your keyboard to save it.
- If the category already exists, select by clicking (or use your keyboard's up/down arrows and Enter/Return).
- You can add as many categories as you wish.
- Delete a category from the list by clicking .
8. Points & extra credit
Enter the number of points and check if the question is extra credit. Unless the question is extra credit, you can't enter more points than are left from the test's total points.
9. Set up feedback for the question
In addition to adding feedback to individual answer options for certain question types, you also have feedback options for the whole question. These items are covered in this article.
Essay questions
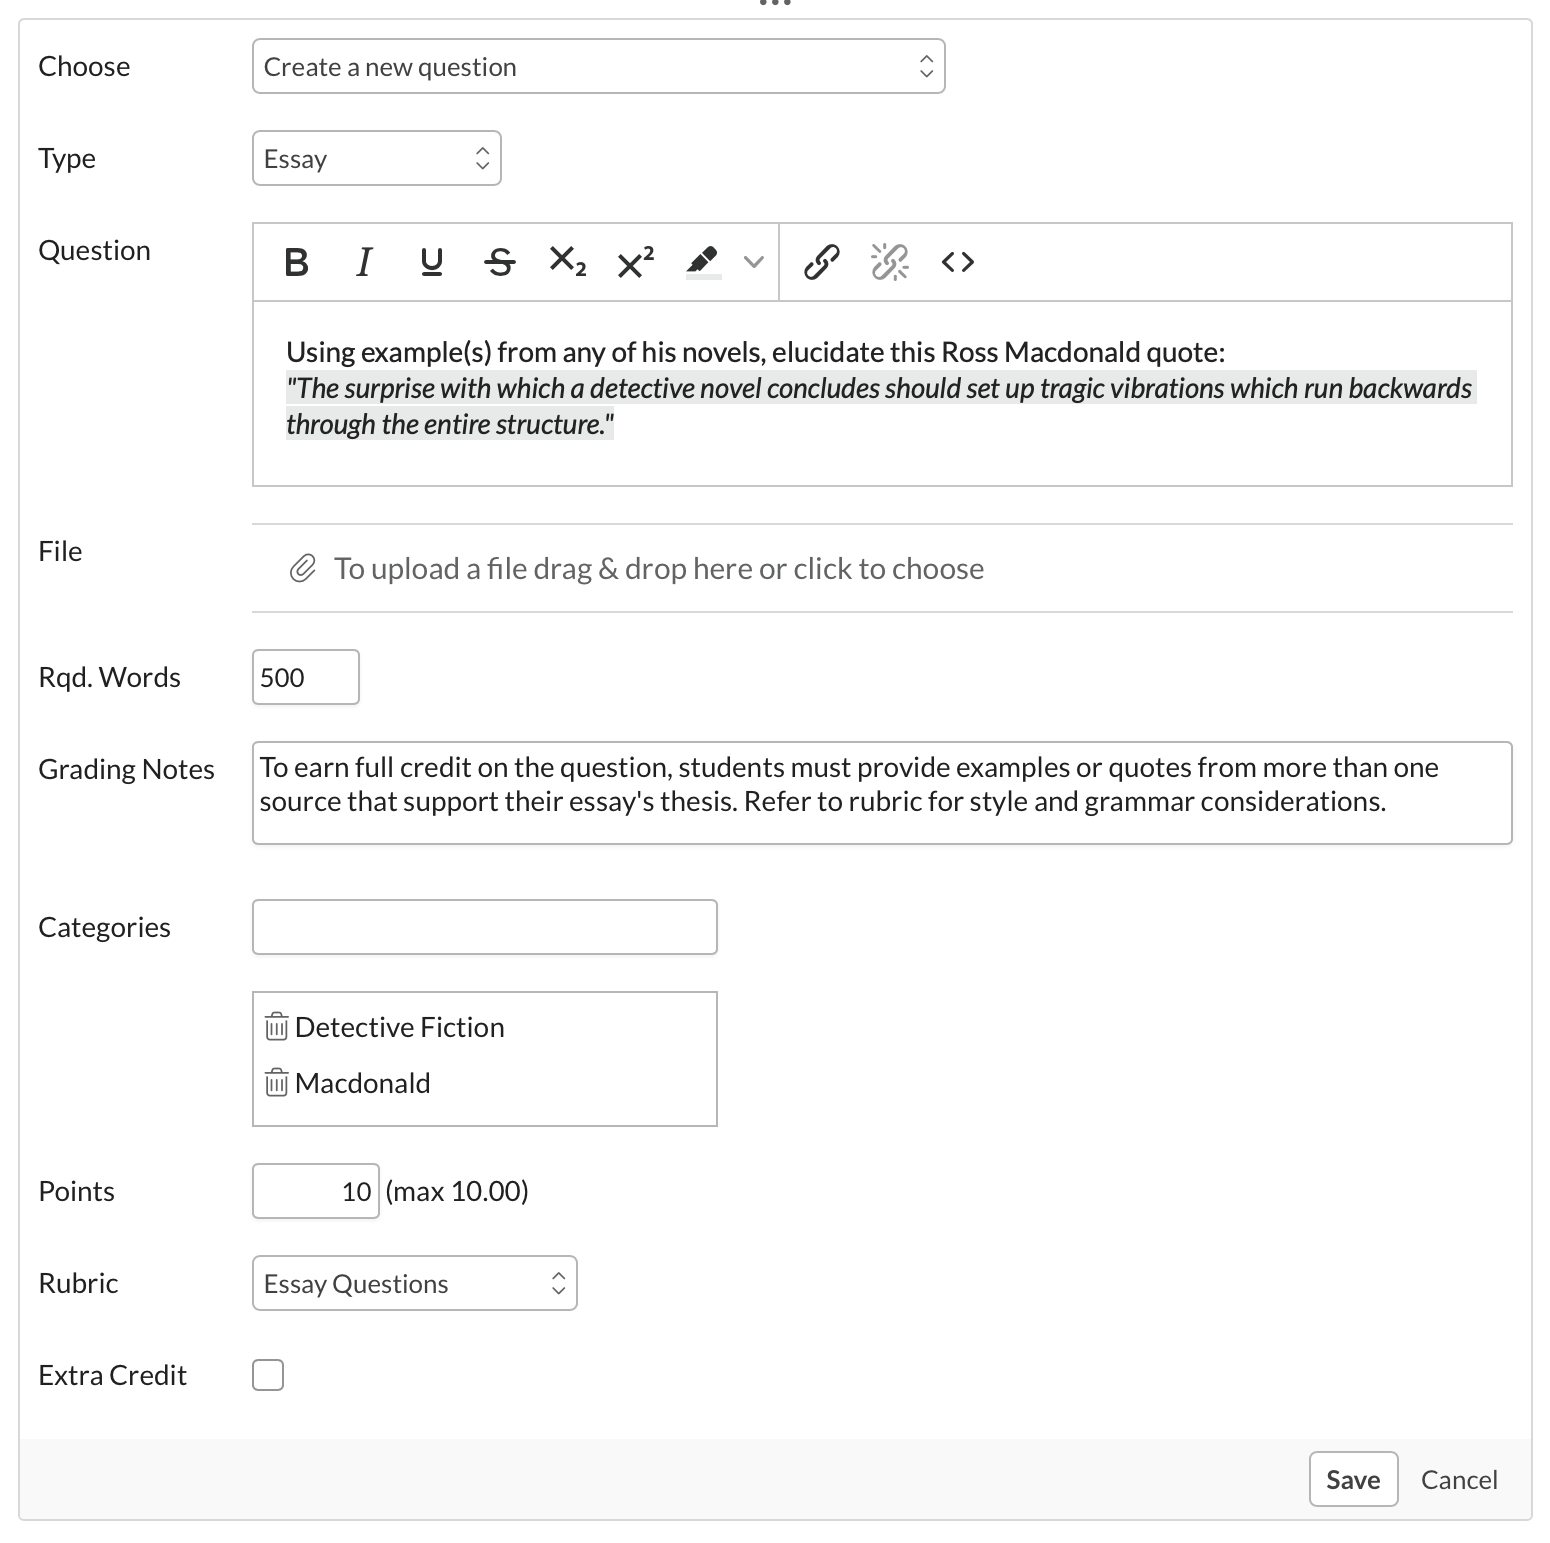
When you create an essay question:
- They can only be manually graded—there are no automatic grading options for them.
- You can require a certain minimum number of words.
- Enter grading notes to guide you and any other course faculty or TAs when grading essays. Students will not see these notes.
- If enabled, you'll have options for plagiarism-checking and rubrics.
Fill-in-the-blank questions
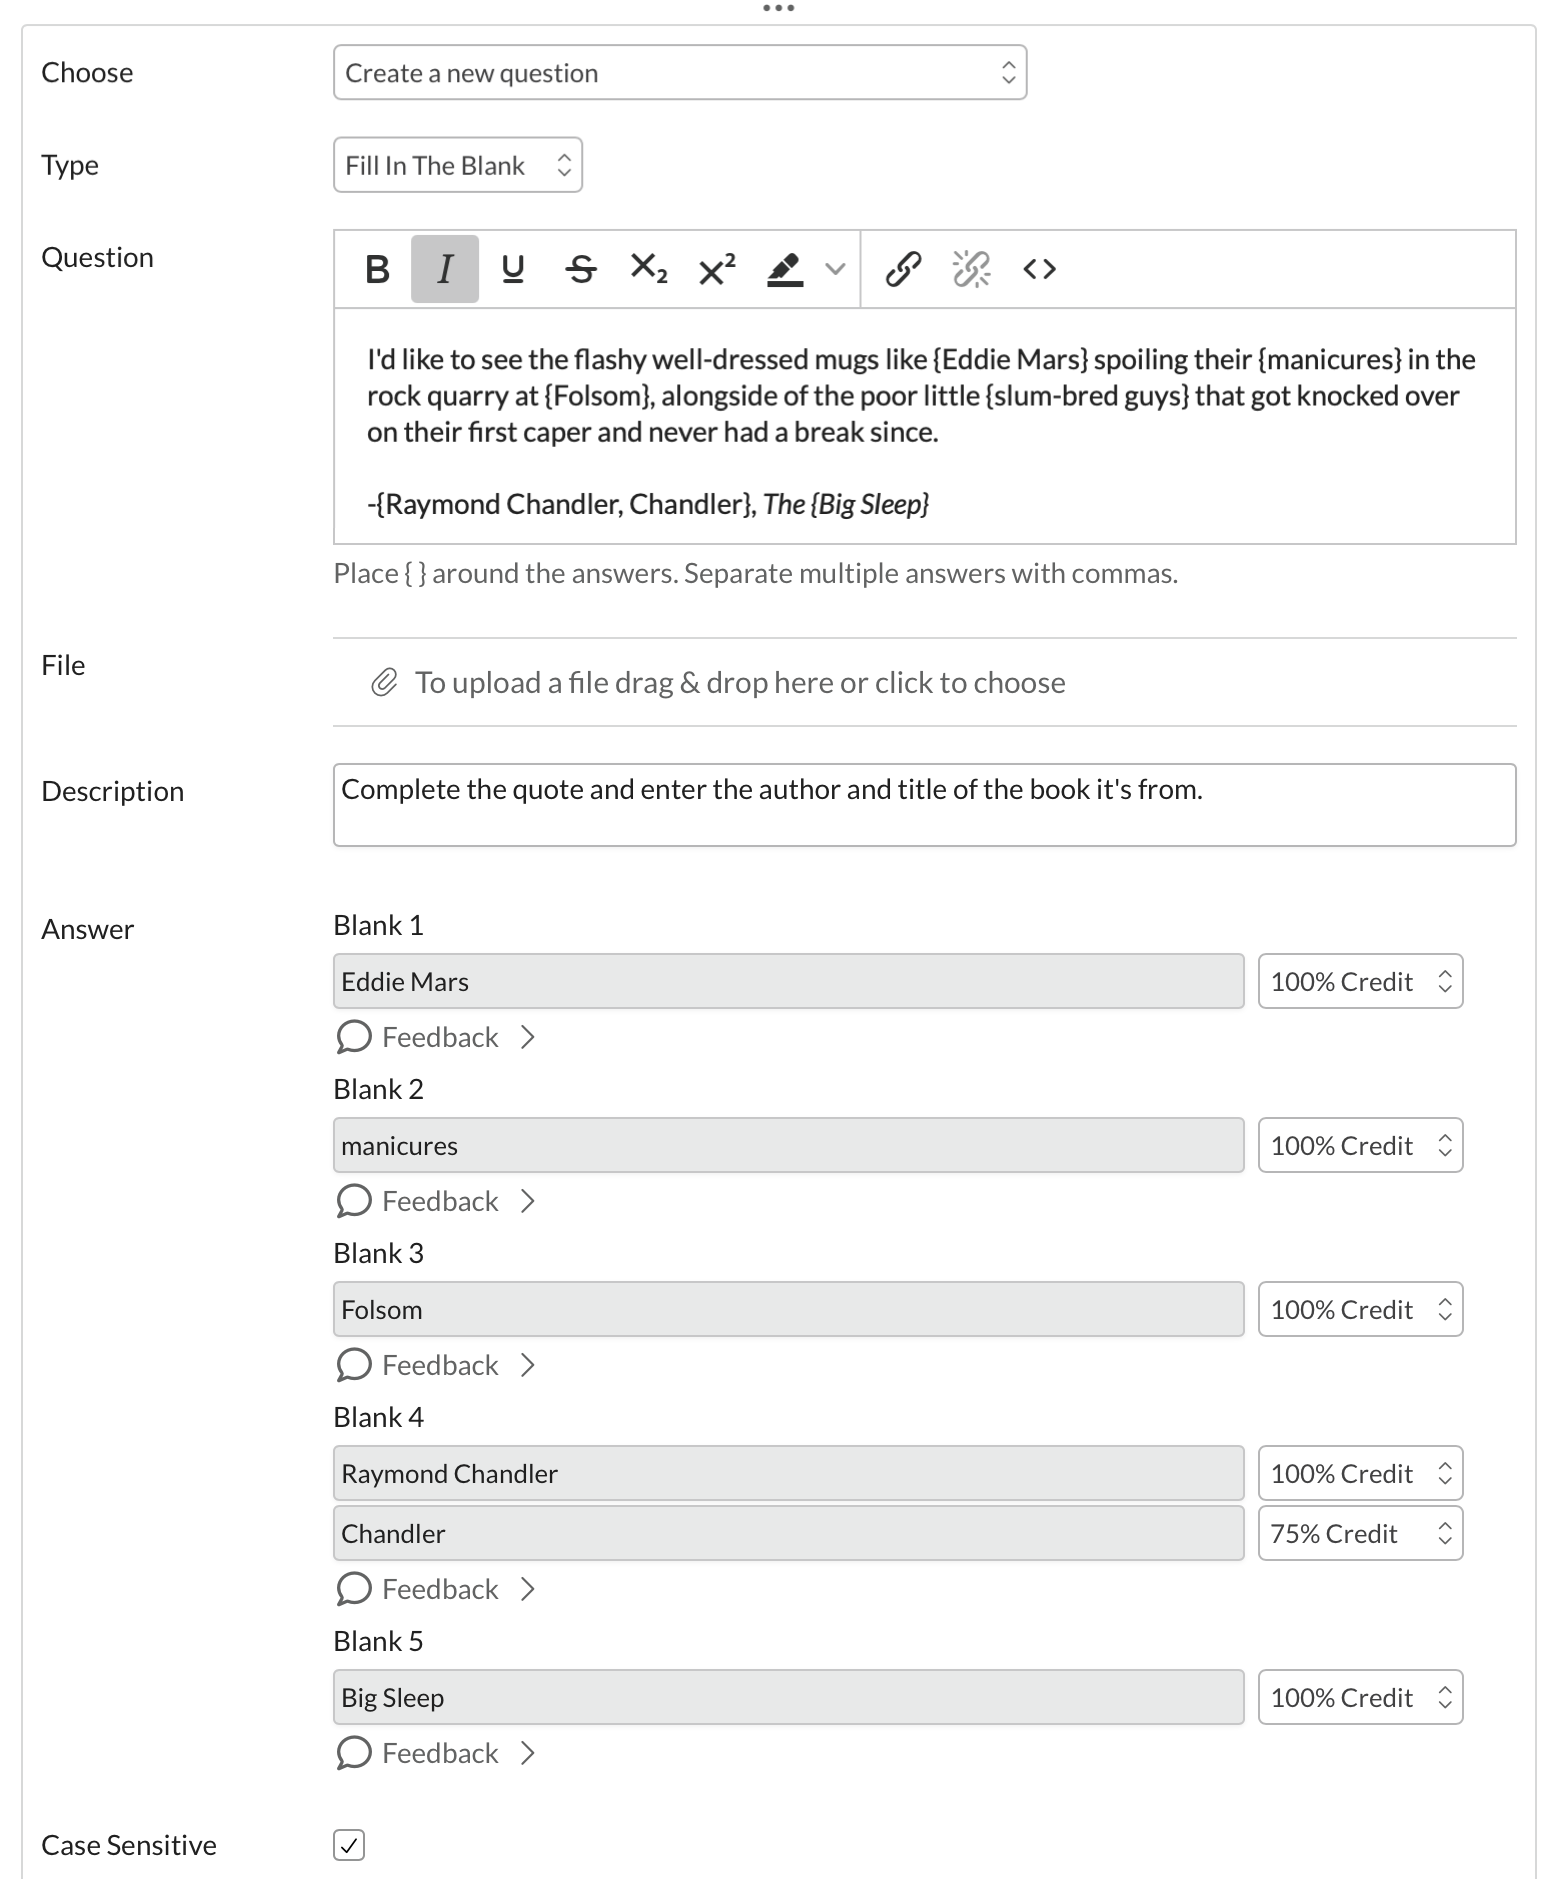
To set up a fill-in-the-blank question:
- Surround the missing (correct) terms with curly brackets—you'll find them just to the right of the P on your keyboard (you'll also need to press the Shift key).
- If there's more than one correct option for a blank, separate them with commas.
- Each option will list below under Answers; you can select the value of each answer option and enter feedback (if enabled).
- Enter a description to provide instructions, etc. for the test-taker.
- An example: A {lie, falsehood} has many {variations, versions}, but the {truth} only one. would display as A _____ has many ____, but the ___ only one. The first two blanks will accept either of the bracketed options as correct, but the third blank will only accept the word truth as correct.
File upload questions

To set up a file-upload question:
- Check the file options you wish your students to have when answering this question. You can check anywhere from one to four of the options in any combination you like. They can upload a file, take a photo, or record audio or video.
- The photo, audio, and video options will require the use of the students' computers' camera and microphone.
- The file upload options let you allow/restrict the student's options for submitting answers to the question:
- All files: If it's on the student's computer, he can upload it to this question.
-
Custom: Enter the extensions for the file types you want students to upload. Separate multiple extensions with commas. Don't use spaces or periods. This will work:
pdf,ppt,docx,pages. This won't:.pdf, .ppt, .docx, .pages. -
Preset: Check the types of files you'd like to allow and the particular extensions for the allowed type. For example, you select Audio and then allow
.mp3and.wavfiles.
- File upload questions and the require fullscreen test integrity feature don't play well together. If your test already contains a file upload question, you will not then be able to require fullscreen. And if your test already requires fullscreen, you will not then be able to add a file upload question.
0 Comments