This article uses terminology native to Populi, which in some cases might differ from what is used in Brightspace. We trust you'll know what we're talking about! In some places we may refer to Brightspace features, documentation, or screenshots; we are not responsible for any errors or omissions in Brightspace-provided materials (just the ones in our own stuff!).
Brightspace is a web-based learning management system (LMS) that some schools choose to use instead of or alongside Populi's own built-in LMS features. Populi includes a Brightspace integration and synchronization feature that lets you share and sync information between the two systems. Users, courses, and enrollments are synced real-time (within a few minutes), while final grades are synced to Populi on a daily basis. Here's what's included in the exchange:
-
From Populi to Brightspace:
- All or selected Academic terms and courses
- All enrollment information including up-to-date students, faculty, and teaching assistants
- Usernames and accounts for anyone enrolled
-
From Brightspace to Populi:
- Final grade for each student. If using the "Release the Calculated Final Grade" setting in the Brightspace course, an "In-Progress" grade can also be synced before final grades are released.
-
Not included:
- Individual assignment/test grades
- Attendance records
- Any lessons, documents, or other course materials
How does the user sync work?
All faculty members and teaching assistants with write permissions in a course will be synced to the Brightspace course. "Hidden" faculty will not be synced. If any Faculty/TAs members are removed from the course, they will also be removed from the course in Brightspace.
All enrolled students and auditors will be synced to Brightspace. The specific user role they get assigned in Brightspace is defined in the Populi integration settings (see below). If a student or auditor is withdrawn or deleted from the Populi course, they will also be unenrolled from the Brightspace course. If a user is blocked or deleted in Populi, their Brightspace user account will be deactivated.
Can existing Brightspace users be synced?
Yes, existing Brightspace users (i.e. accounts not generated though the integration) can still be synced. If Populi finds an existing match between usernames in both systems, it will connect to the existing user rather than creating a new one.
If you find that some duplicate accounts were generated because the username match was not exact, we recommend you delete the unwanted duplicate accounts in Brightspace and then change either the Brightspace or Populi usernames so that the match is exact. On the next sync, the users should then connect automatically.
How do grades sync between Populi and Brightspace?
Here's how syncing grades from Brightspace to Populi works:
- After the final grade is released to students in Brightspace (this could be either an Calculated Grade or Adjusted Grade), it will be synced to Populi on the next daily grade sync. If using the Release the Calculated Final Grade setting in the Brightspace course, an In-Progress grade can also be synced before final grades are released. You can also sync grades manually to a particular course at any time using the manual sync option (more on this below under Manual Sync Options).
- After the grades due date of the course or term, we stop syncing grades from Brightspace to Populi altogether.
Here are a few things to keep in mind:
- While Populi will create and sync courses automatically in Brightspace, it will never delete them unless you specifically request this from our Support team.
- If you wish to have certain courses appear in Brightspace but not in Populi, simply create them manually in your Brightspace site. Populi will only touch courses created automatically through the integration. Manually created courses will be ignored.
- Once a student's enrollment is finalized in Populi, his grade will not change in Populi. This means that if you finalize a student in Populi, he won't receive any new grades from a Brightspace sync.
- Brightspace courses can release a "Calculated Final Grade" or "Final Adjusted Grade" to students. Whichever of these grades is set to release to students in the course settings will be synced to Populi.
Requirements
To use the Populi/Brightspace sync features:
- You should involve someone on your staff who is familiar and confident in Brightspace account administration with setting up and testing your integration.
- You will need access to a Super Administrator Account in Brightspace.
Setting up the integration in Brightspace
- While logged in as a Super Administrator, click the Admin Tools menu and select Manage Extensibility.
- Click OAuth 2.0 > Register an Application.
- Give the Application a name such as "Populi".
- Fill out the form as follows:
| Field name: | Fill in... |
| Name | Any desired name, such as "Populi" or "Populi sync" |
| Redirect URI |
Note: Be sure to substitute "myschool" for your school's Populi domain name! |
| Scope | |
| Access Token Lifetime | |
| Refresh Tokens | Leave checked |
| Prompt for user consent | Optional: if checked, you will be prompted for your content later on in the process when you link your Brightspace account in Populi. |
When finished, click Register. On the next page, you will see your new Application's Client ID and Client Secret. You will need to copy these over to Populi in the next step.
Setting up the integration in Populi

To set up the Brightspace integration in Populi, you'll need to be a Populi Account Administrator for your school:
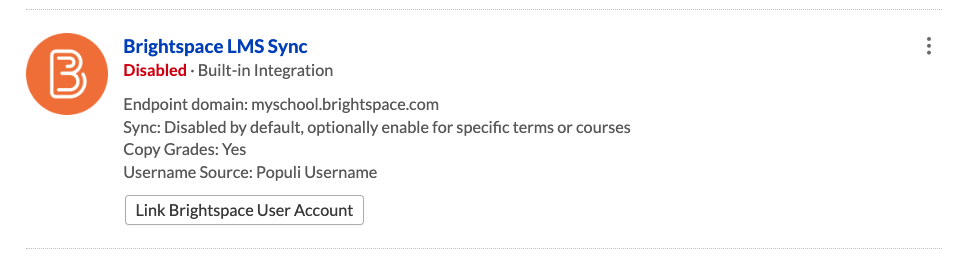
- Go to Account > Integrations. Click Add Integration > Built-in Integrations > Brightspace LMS Sync. There are six Brightspace-related settings:
Field name: Fill in... Brightspace Client ID Paste the Client ID for the Application you created in the previous step. Brightspace Client Secret Paste the Client Secret for the Application you created in the previous step. Brightspace LMS endpoint domain This should be your Brightspace site domain. For example:
myschool.brightspace.com
Sync to Brightspace LMS This is disabled by default. When getting started, set this to Disabled by default, optionally enabled for specific terms or courses.
Brightspace Username Source Choose the format of Brightspace usernames generated through the integration. The options are Populi username with or without your school's domain suffix appended to the end (e.g. populiusername or populiusername@myschool.edu). If using Single Sign On, consult Brightspace support to ensure the format is compatible with your SSO configuration. Sync Grades from Brightspace to Populi Choose whether to pull grades from Brightspace to Populi. If turned on, grades will be pulled once a day from Brightspace for each course. - After you save these settings, the integration will be in a "disabled" state until the next steps are completed.
- Link a Brightspace user account to the integration. All API communication with Brightspace will happen through a specific user account. This account MUST have the Super Administrator role in Brightspace or the integration will not function properly. To link the account, click the "Link Brightspace User Account" button on the integrations page. This link will launch you into Brightspace, where you may be prompted to login and/or grant permission to the integration to use your user account to communicate with Brightspace behind the scenes.
- When finished, the launch will redirect you back to Populi, where you can complete the final step by configuring User roles for the integration. Click the button "Configure User Roles".
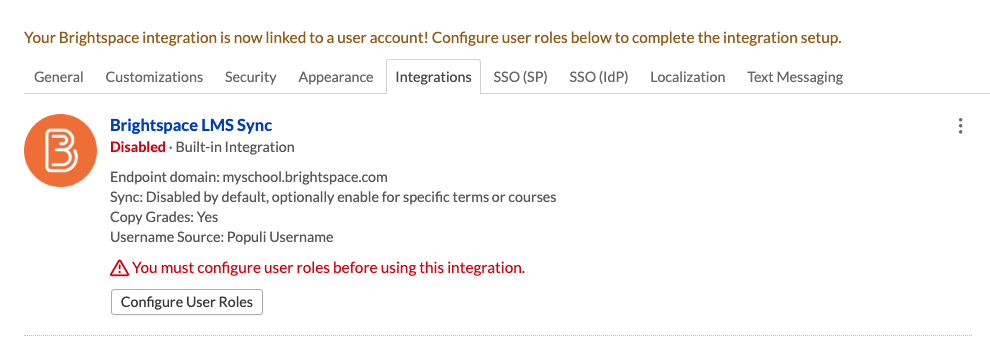
- Map each of the four Populi roles to the role those users should have in Brightspace.
Including Populi courses in the Brightspace sync
To sync an individual course:
- Go to the Course > Settings view.
- Click the LMS Sync setting and select Brightspace.
To sync all courses in a particular term:
- Go to Academic Term > Info and select a term from the drop-down.
- In the Information panel, click the LMS Sync setting and select Brightspace.
Manual Sync Options
Populi will be syncing your course data and enrollments real-time as you make changes in your synced courses. Generally, you should see your changes reflected in Brightspace within a few minutes. Grades, on the other hand, are pulled once a day. You may also trigger a manual push or pull action for a particular course at any time. This may be useful in cases where the integration was turned off or disabled temporarily, causing some courses to get out-of-sync. To perform a manual push or pull action, go to Course > Settings and click the word "Brightspace" to open the dropdown options.
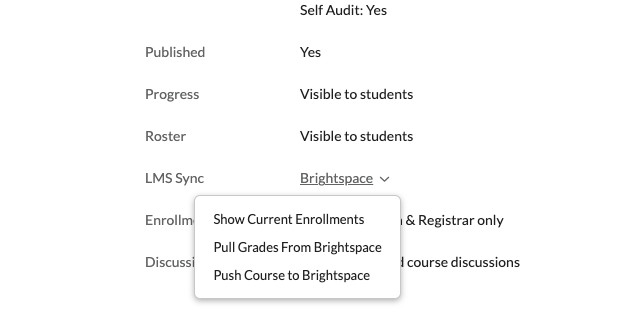
Show Current Enrollments: Click this option to display a full report showing each user in your course and their corresponding user in Brightspace. If grade sync is turned on, we will also display the grades side by side to help identify any discrepancies.
Single Sign-On
Brightspace can also be configured to use Populi as an identity provider for Single Sign-On (SSO) user authentication. If you're going this route, you'll really need to know what you're doing—configuring SSO is not for faint-of-heart dabblers!
- Read about how to configure Populi as an identity provider.
- In Populi, go to Account > Account Settings > Single Sign-On (IdP) and configure Brightspace as an application. Those settings will look something like this.
- For the Brightspace portion of the setup, follow the instructions in their documentation.
0 Comments